Navigating in eCredit
Overview
You navigate in eCredit using the following:
The main navigation bar.
Submenus for each navigation bar.
The Admin, Help, About and Logout links at the upper right of the screen.
The Go To list found on many longer eCredit screens.
The Actions list found on customer and credit request screens.
The tabs found at the left of each screen.
The 'quick search' box found on each screen for a customer or credit request.
Every eCredit screen contains the main navigation bar at the top of the screen. The links actually included in the navigation bar vary, depending on the capabilities included in your assigned role.
View the main navigation bar.
Submenus for the navigation bar
When you select the tab for a module from the navigation bar, a submenu of choices for that module appears below the navigation tab. This submenu enables you to search the module and to create a new credit request, customer, work queue task, or report, depending on the module. For the Customer Analysis module the submenu includes links to create a new customer. For the Work Queue module, the submenu includes a link to create a new Work Queue task.
View the submenu tabs for a navigation bar.
Links at the upper right
Each screen also contains links at the upper right of the screen to access the Admin module, the Help system, information about eCredit, and to log out. These links are available to all user roles. For non-Admin users, the Admin link enables you to change your User Profile information.
View these links.
The Go To list
Some screens are divided into sections. Each section has a name with a green highlight. Longer screens have a drop-down Go To list to facilitate navigation to a section of the screen. When you select the name of a section from the Go To list, the screen scrolls to your selection.
View the Go To list.
The Actions list
At the top of each screen for a customer or credit request is an Actions list.
For credit, use the Actions list to:
Create a work queue task for the credit work queue (Move to Work Queue link)
View the work queue tasks for the customer or credit request (Task List link)
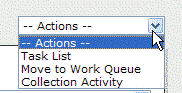
For Collections, you can select
view the currently due and past due action items for the customer (Collection Activity link), or
view all open disputes for the selected customer assigned to you (Dispute Management link)
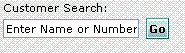
Search for a customer from any screen
There is a 'quick search' box at the left top of each screen for a customer or credit request. You can use this box to search for a customer by name or number without returning to the Customer or Credit Request Search screens.